
 Bikepacking: Complete Beginner’s Guide – From Choosing Your Bike to Your First Overnight Adventure
Picture this: you’re pedaling along a forest trail, breathing in the scent of pine after rain. Ahead lies only the road you’ve chosen, while behind you, in compact bags, rests everything necessary for living—your small mobile home. This isn’t just a bike ride. This is freedom. This is bikepacking.
For many, the idea of bicycle camping seems complicated, accessible only to experienced athletes. This couldn’t be further from the truth. Bikepacking represents a philosophy of minimalism and self-sufficiency on two wheels, available to virtually anyone ready for adventure.
This guide isn’t just dry theory—it’s a step-by-step instruction taking you from “I want to, but don’t know where to start” to your first autonomous bicycle journey. We’ll cover everything: which bike and bags to choose, what gear you genuinely need, how to handle food and navigation, and how to plan routes that bring joy rather than suffering. Ready to transform dreams into plans?
What is Bikepacking and How Does it Differ from Bike Touring?
At first glance, both involve bicycle travel. But as always, the devil’s in the details. Understanding the difference proves key to choosing proper equipment and trip format.
Classic bike touring inherits from hiking traditions. It’s characterized by massive rear (sometimes front) racks supporting voluminous panniers. This approach allows carrying substantial gear but makes bicycles cumbersome, heavy, and poorly maneuverable on narrow trails and rough terrain. Bike tourists typically follow paved roads.
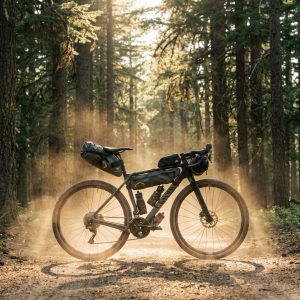
Bikepacking essentially adapts ultralight backpacking for bicycles. The core idea: eliminate racks in favor of specialized bags attaching directly to frame, handlebars, and seat post.
Key Bikepacking Characteristics
Minimalism: You carry only essentials. Weight and volume prove critically important.
Trail Capability: Bicycles remain narrow and maneuverable, allowing departure from pavement to forest trails, dirt roads, and mountain paths—terrain traditional tourists cannot navigate.
Weight Distribution: Load distributes more evenly across the bicycle, improving handling and balance.
Equipment: Utilizes lighter, more compact camping gear similar to ultralight hikers.
Simply put, bike touring means “transporting your house to the cottage,” while bikepacking represents “taking exactly enough to remain free.”
Choosing Your Bikepacking Bicycle: What Rides Take You to Adventure?
Good news: almost any functional multi-geared bicycle works for initial weekend trips. However, if you’re planning serious bikepacking, consider specialized models.
Gravel Bike: The Universal Soldier
Perhaps the most popular choice for modern bikepacking. Gravel bikes hybridize road and mountain bicycles.
Advantages:
- Fast on pavement and packed dirt roads
- Comfortable geometry for long rides
- Drop bars provide multiple hand positions, preventing fatigue
- Numerous frame and fork mounts for bottles and bags
- Accommodates wide tires for better traction and cushioning
Limitations: On technical terrain—roots, rocks, steep descents—it trails mountain bikes.
Mountain Bike (MTB): Off-Road Conqueror
If your routes traverse forests, mountains, and rough roads, choose an MTB.
Advantages:
- Suspension fork (sometimes rear shock) absorbs roughness
- Wide aggressive tires ensure maximum traction
- Powerful brakes and robust frames handle harsh conditions
- Flat bars provide confident control on descents
Limitations: Slower on pavement, requiring more effort than gravel bikes.
Can You Use Road or City Bikes?
Road bikes: Possible, but only for perfect pavement routes. Narrow tires and limited frame clearance prevent dirt road adventures.
City/Hybrid bikes: Acceptable for short 1-2 day trips, but serious journeys may expose inadequate geometry and component reliability.
The Bag System: Storing Everything Without Racks
Bags represent bikepacking’s heart, determining how your bicycle looks and performs. The basic setup comprises three bags.
Saddle Bag (Seat Pack)
Attaches behind the saddle rails and seat post. This large cone-shaped bag typically holds bulky, lightweight items.
What to pack: Sleeping bag, spare clothing, down jacket
Features: Capacity ranges from 5 to 17 liters. Pack tightly and compress to prevent swaying while riding.
Handlebar Bag (Handlebar Roll)
Represents a dry bag attaching to handlebars via specialized harness, or integrated bag.
What to pack: Tent, sleeping pad, tarp—long, relatively light items
Features: Ensure the bag doesn’t interfere with brake levers and shifters. Drop bars impose width limitations.
Frame Bag
Fills the front triangle of your frame—your bicycle’s center of gravity.
What to pack: Heaviest items—tools, repair kit, power bank, food, sometimes hydration reservoir
Features: Available in standard sizes or custom-made for specific frames. Custom versions maximize space efficiency.
Additional Bags and Mounts
- Top Tube Bag: For readily accessible items—phone, snacks, cash
- Feed Bags: Small handlebar pouches for water bottles and snacks
- Fork Anything Cages: Allow securing dry bags or extra water bottles to fork legs
Properly selected bag systems accommodate 30-40 liters of cargo—more than sufficient for multi-day autonomous trips.
Where to Buy Bikepacking Gear in Canada
Finding quality bikepacking gear in Canada is easier than ever, and buying locally means better warranty support, knowledgeable staff, and no cross-border shipping headaches.
MEC (Mountain Equipment Company) — Canada’s best-known outdoor co-op, with locations in Vancouver, Calgary, Toronto, Ottawa, and beyond. MEC carries a solid selection of bikepacking bags, ultralight tents, sleeping bags, and cook systems. Their in-store staff often include active cyclists who can give real-world advice. MEC’s own-brand gear offers strong value for beginners. mec.ca
Decathlon Canada — Excellent entry-level option for budget-conscious beginners. Decathlon’s Btwin and Quechua lines cover bikes, panniers, tents, and sleeping bags at prices that make first-time gear purchases painless. Locations in Montreal, Quebec City, and online shipping across Canada. decathlon.ca
Arkel — A proudly Canadian brand based in Quebec, Arkel has been handcrafting premium bike bags since 1988. Their bikepacking-oriented bags are built for Canadian conditions: waterproof, durable, and thoughtfully designed. If you want to support local manufacturing and invest in gear that lasts a decade, Arkel is the name to know. arkel-od.com
The Big Three Camping Essentials: Your Home Away From Home
Your bivouac camp represents what many seek in bikepacking. Three foundations of comfortable overnight stays: shelter, sleeping bag, and pad.
Tent or Tarp: Which to Choose?
Bikepacking Tents:
Pros: Complete protection from wind, rain, and insects. Greater comfort and privacy.
Cons: Higher weight and volume compared to tarps.
Look for: One or two-person ultralight tents weighing under 1.5-2 kg. Check pole length when packed—they must fit your handlebar bag or attach to frame.
Tarp or Bivy Sack:
Pros: Minimal weight and volume. Maximum nature immersion.
Cons: Requires setup skills. Protects only overhead (tarp) or creates condensation (bivy). Doesn’t protect from persistent insects.
Look for: 3×3 meter tarp—universal option. Bivy sacks suit experienced minimalists.
For beginners, tents clearly win. They forgive campsite selection errors and ensure peaceful sleep.
Sleep System: Sleeping Bag and Pad
These elements work together. Your sleeping bag provides top insulation while the pad insulates from cold ground.
Sleeping Bag Options:
- Down: Lighter, warmer, more compressible than synthetic at equivalent weight. Vulnerable to moisture (though modern models feature hydrophobic treatment). More expensive.
- Synthetic: Moisture-resistant, maintains warmth when wet. Heavier and bulkier than down. Cheaper and easier to maintain.
Selection: Summer trips in temperate regions need bags rated for +5…+10°C comfort. Shoulder seasons and mountains require 0°C and lower.
Sleeping Pad Types:
- Foam: Cheap, indestructible, puncture-proof. But bulky.
- Self-Inflating: More comfortable than foam, good insulation. Medium weight and volume. Puncture-vulnerable.
- Inflatable: Lightest and most compact when packed. Most comfortable. But expensive, requires careful handling.
Selection: Bikepacking favors inflatable or self-inflating pads for compactness. Always carry repair kits!
Camp Kitchen: Cooking Delicious, Efficient Meals
Hot food after long days isn’t luxury—it’s essential for recovery and maintaining morale.
Cooking System
Stove: Most common option—gas canister stoves. Lightweight, compact, simple to use. Available as screw-on or remote (more stable) types.
Fuel: Threaded gas canisters (standard connection). Weekend trips typically require one 100-230 gram canister.
Alternatives: Alcohol stoves (lighter but less powerful), wood-burning stoves (use sticks but soot cookware and are prohibited in many areas).
Cookware and Utensils
- Pot: Titanium or anodized aluminum pot, 0.7-1.0 liter capacity per person
- Cup: Can double as eating bowl
- Spork: Lightweight combination spoon-fork utensil
- Knife: Small folding knife
Food and Water: What to Eat and Where to Find Water?
Meal Planning
Breakfast: Instant oatmeal, granola
Lunch/Snacks: Nuts, dried fruit, energy bars, jerky
Dinner: Freeze-dried meals or soups, pasta, rice
Water—your most important, heaviest resource:
- Planning: Pre-scout spring, well, village, and store locations on maps
- Filtration: Wilderness areas without verified sources require water filters, preventing intestinal illness
- Reserve: Always carry minimum 1.5-2 liters using frame bottles or hydration bladders
Clothing and Personal Items: Layering Principle in Action
Trip weather varies unpredictably. The “dress like an onion” principle works perfectly.
Three-Layer System:
- Base Layer (Thermal Underwear): Wicks moisture from skin. Synthetic for active movement, merino wool for sleep and cold
- Mid Layer (Insulation): Fleece jacket retains heat, even when damp
- Outer Layer (Protection): Windbreaker protects from wind; membrane jacket and pants shield from heavy rain while breathing—critical investments
Additional Clothing Essentials
- Cycling kit: Padded shorts for saddle comfort, jersey
- Socks: 2-3 pairs (one for sleeping)
- Headwear: Cap or bandana for sun protection, warm hat for camp
- Gloves: Cycling gloves for hand protection
- Footwear: Clipless cycling shoes or comfortable sneakers/hiking boots. Camp sandals or crocs for relaxation
Don’t forget personal first aid (bandages, antiseptic, pain relievers, chronic condition medications) and hygiene kit (toothbrush, paste, small soap bar, sunscreen).
Tools and Repair Kit: What Saves You in the Wilderness?
Mechanical failures far from civilization prove unpleasant but probable. Your repair kit provides insurance.
Essential Minimum:
- Pump: Compact, matching your valve type
- Spare tube: Even with tubeless tires
- Patch kit: Self-adhesive patches or patches with glue
- Tire levers: 2-3 pieces for removing tires
- Multi-tool: Hex keys, screwdriver, chain breaker
- Chain quick link: Small part enabling fast chain repairs
- Chain lubricant: Small bottle
- Duct tape and zip ties: Fix nearly anything from torn bags to broken mounts
Before departing, verify you can use all these tools. Practice tube changes at home.
Packing Art: Proper Weight Distribution
Correct packing affects not just convenience but safety, improving bicycle handling.
Weight Distribution Guidelines
- Low and Central: Heaviest items (tools, food, water) go as low and centered as possible—ideal location is frame bag
- Light and Bulky Behind: Sleeping bag and clothing in saddle bag
- Medium Weight Forward: Tent and pad in handlebar bag, balancing saddle bag weight
- Immediate Access On Top: Phone, navigation, snacks, cash in top tube bag or feed bags
Use dry bags: They protect items from rain while compressing contents, reducing volume.
Test ride: Before major trips, fully load your bicycle and ride locally. You’ll immediately feel changed handling and can repack accordingly.
Wildlife Safety in Canada: Bears, Bear Spray, and Bear Hangs
If you’re bikepacking in Canada — especially in British Columbia or Alberta — wildlife safety isn’t optional reading. Black bears and grizzlies are active across most backcountry trails from spring through fall, and an encounter without preparation can turn dangerous fast. The good news: a few simple habits dramatically reduce risk.
Bear Spray is your most important safety tool. Carry a 225 ml canister (minimum) in a holster on your hip or handlebar bag — never buried in a pack. Studies consistently show bear spray is more effective than firearms at deterring charges at close range. Practice accessing it quickly. Parks Canada recommends spraying in a wide arc when a bear is within 10–15 metres and charging. MEC and most outdoor shops in BC and Alberta sell bear spray; some national park visitor centres rent canisters.
At camp, food storage is critical. Never keep food, cookware, or scented items (toothpaste, sunscreen, lip balm) in your tent or near your sleeping area. The standard backcountry method is the bear hang: suspend all food and scented gear in a bag at least 4 metres off the ground and 2 metres away from the trunk, using a rope thrown over a sturdy branch. In many BC and Alberta campgrounds, bear lockers or food poles are provided — use them. In areas with high grizzly activity (Banff, Jasper, Kootenay), a lightweight bear canister adds an extra layer of security and is sometimes required by regulation. Make noise while riding — calling out “hey bear” on blind corners warns animals before you surprise them.
Quick Wildlife Checklist for Canadian Bikepacking:
- Bear spray in accessible holster — always
- Bear hang or canister for all food and scented items
- Cook and eat at least 100 m from your sleeping area
- Make noise on blind trail sections
- Check Parks Canada advisories for your specific area before departure
Planning Your First Route: From Concept to Start
Good planning equals half the success. Initially, avoid multi-day autonomous expeditions. Start with weekend overnight trips.
Finding Route Ideas and Tracks
- Specialized sites: Komoot, Bikepacking.com, Ride with GPS — find ready routes with descriptions and photos
- Mapping services: OpenStreetMap, Strava Heatmap — independently “draw” routes, view popular trails, terrain, water sources
- Other travelers’ reports: Forums, blogs, social media. The subreddit r/bikepacking is particularly active and full of Canadian-specific trip reports and gear advice.
- Canadian routes to consider: The Trans-Canada Trail (also known as The Great Trail) is the world’s longest recreational trail network at over 27,000 km, with many sections bikeable — ideal for building your first multi-day routes close to home. For Ontario riders, the Log Driver’s Waltz route (popular on r/bikepacking) traces quiet logging roads and rail trails through the Ottawa Valley, offering accessible wilderness with convenient bailout points. Both routes have active online communities sharing current conditions.
On-Route Navigation
Relying on memory and signs proves foolish.
Smartphone: Most accessible option. Install Maps.me, OsmAnd, Locus Map (Android) or Guru Maps (iOS). Download regional maps for offline use and load route tracks (GPX format). Don’t forget power banks!
Bike Computer/GPS Navigator: Specialized devices from Garmin, Wahoo, etc. More battery-efficient, better satellite reception, weather-resistant.
First Route Selection Principles
- Distance: 40-60 km daily on dirt suffices initially
- Terrain: Avoid major elevation changes
- Logistics: Choose routes with convenient public transit access
- Emergency Exits: Prefer routes with easy bailout points to civilization
First Trip Tips: Avoiding Common Mistakes
Key Recommendations:
- Start small—single overnight trips provide 80% understanding
- Don’t overpack—resist “just in case” temptations
- Eat and drink before feeling hungry/thirsty—regular intake prevents energy crashes
- Share your route with friends or family
- Don’t chase mileage—bikepacking isn’t racing, it’s process. Enjoy views, stop frequently, photograph
- Leave campsites cleaner than found—take all trash. Basic principle respecting nature and fellow travelers
- Expect the unexpected—flat tires, bad weather, closed stores are adventure components. Maintain positive, flexible attitudes
Conclusion: Your Adventure Begins Here
Bikepacking transcends simple riding with bags. It’s rediscovering familiar places and exploring unknown corners. It’s personal challenge rewarded with incredible freedom and self-sufficiency feelings.
We’ve covered all key aspects: from selecting proper bicycles and gear to packing nuances and route planning. Yes, initial information volume may intimidate, and equipment costs may discourage. But remember: start small with what you already own, gradually improving and acquiring necessities.
Ready to Begin?
Don’t wait for perfect moments or complete top-tier equipment sets. The perfect moment is now. Plan a short weekend outing, pack essentials, and simply ride. Your first grand two-wheeled adventure begins not on distant mountain trails but with initial pedal strokes beyond your doorstep.
Good luck on the roads!